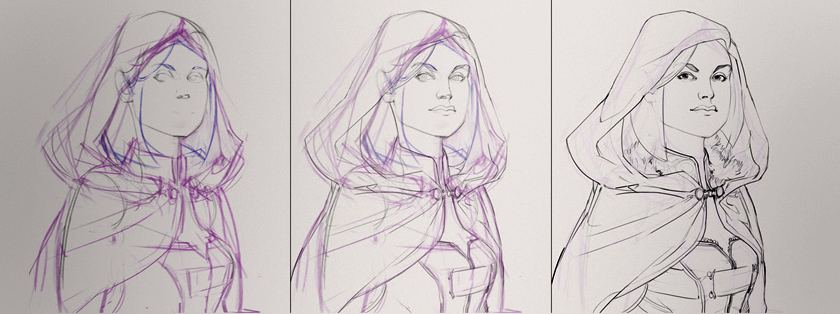
The entire process of design is filled with refinement: make a variety of options (thumbnails, color palettes, etc.) - and choose the best one. What if you could automate some of that? This video shows a technique to multiply your color roughs when making a character design in order to dramatically increase the total output. It's a bit messy, but you'll save a ton of time. If you want to see a similar process with thumbnails, make sure to watch this older Ctrl+Paint video.
Like anatomy? That's a start, but character comes from a deeper place than mathematical precision. The real story comes from expression. Whether it's body language or facial expressions, people are constantly communicating. If you neglect this aspect of personality when learning to draw people and characters, you might end up with 'lifeless' or 'plastic' results. This video introduces some good examples for study including my favorite: Glen Keane. Glen does not seem to have a personal website I can promote, though a quick google search will lead you to fan-collected images.
design_basics_preview
Since Ctrl+Paint began, I've been asked to make a series about creating concept art. Well, this is it! Earlier drafts took different forms, but finally I decided to make this series as versatile as possible and explore the rules of visual language. As a result, the ideas in this series can be applied to any subject-matter you like.
[UPDATE] This is now available in the store!
Concept art is all about visual design. After all, how do we know if we're looking at a hero or a villain? It's easy to forget that concept artists do more than just draw cool stuff. Their real task is to communicate with a viewer through shapes and colors - to make it absolutely clear who is the hero, and who is the villain. Design Basics, coming to the store on Wed. October 17th, examines this silent language: the language of design.
Whether you're designing props, characters, environments, or even your personal website - the rules are all the same. The videos in this series explain how to gather and utilize visual reference, plan your characters, and infuse them with the principles of good design. Unlike the other store offerings, this series is completely lecture-based and you won't see me drawing on screen. Instead it covers the process and iteration that lead to the final robot design; focusing on the idea process and not the tools themselves.
What should I draw today? This is possibly the most common question to any artist - beginner or pro. Unless you're given an assignment by your client/boss, this question has a tendency to paralyze. Since I work much more fluidly from an assignment with narrow guidelines, I've begun 'generating' fake assignments for my personal art. This is a fun way to have spontaneous ideas and get yourself out of a drawing rut. As I mention in the video, here are some links to fantasy and sci-fi generators to get your ideas flowing: From donjon: Sci-fi character, Sci-Fi Spaceship, Fantasy Character, Fantasy Castle, Weather
From Chaotic Shiny: Flag, Musical Instrument, Fighting arena, Magical familiar
Special Bonus: I spoke with the creator of Chaotic Shiny and she asked for generator ideas! She liked the idea of these being used for artwork, and is willing to field ideas for custom generators. If you have any ideas for random generators, please put them in the comments! I'll make sure to pass along the results.
The bad news: Ctrl+Paint isn’t going to be your source for learning anatomy. I only want to teach subjects that I feel totally comfortable with, and frankly... anatomy isn’t one of them. The good news: anatomy is already very well documented! This post is going to become a ‘living document’ about anatomy instruction. I’m starting it out with a few of my favorites, and I’ll add additional sources as I learn about them. Do you have a favorite? Send me an email or add it to the comments!
Constructive anatomy
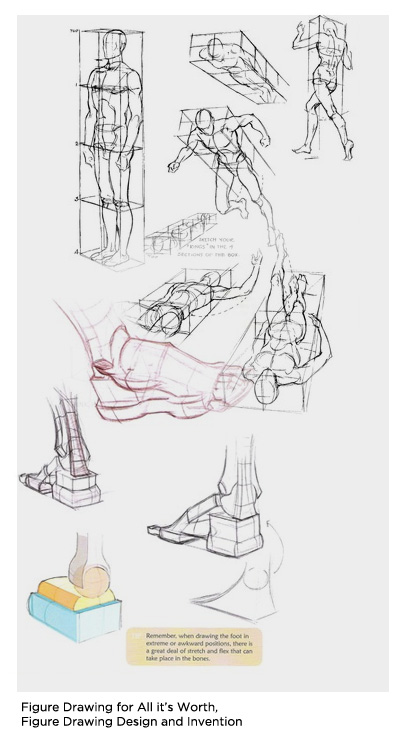
Of the two major approaches to figure drawing, this is the technique designed for drawing from your imagination. In short, you break the body down into geometric forms in order to envision them from any possible camera angle. Illustrators, comic artists, and concept artists often work in this way because it is versatile and does not require exact reference. This type of drawing absolutely requires perspective drawing, so make sure you’re comfy with that before you dive into the human form.
Why it’s useful: It’s versatile. If you’re working with deadlines, you might not have the ability to find a model or shoot your own reference photos. It’s also a great building block for stylized drawings and designing creatures, monsters, and dinosaurs. If you’re able to simplify a human body, the same exact skills help you envision anatomy that doesn’t exist in real life. Additionally, this skill helps in designing human-like creatures such as robots and some vehicles.
Where it falls short: Specific details. It’s easy to fall into a “Barbie and Ken” trap in which you always draw your figures the same way. In order for this process to work you’ll be simplifying the characters in your mind - creating a visual ‘shorthand’. When rushing, this often leads to your characters looking repetitive. It’s important to use photo reference for specific details like interesting haircuts, clothing styles, and faces.
Resources:
Figure Drawing Design and Invention by Michael Hampton - This book is fantastic. I’ve read a lot of books which help simplify anatomy into geometric pieces, but this is by far my favorite. Get it in print, not as a .PDF -- you’re going to want this one on your desk at all times.
Andrew Loomis - I’ve mentioned him in previous videos, but he’s worth mentioning again. This classic commercial illustrator amazing at simplifying the body into a formula. If you’ve ever read a “How to draw ____ characters” book, it’s a bit like that.... but 1000 times more useful. Truly a master.
The Vilppu Drawing Manual by Glen Vilppu - He’s a modern master following in the tradition of Andrew Loomis. I had the pleasure of attending a lesson with Glen and he’s an amazing instructor. Not to be missed.
Observed Anatomy
The term "classical figure drawing", or observed anatomy, involves using a using a live model or photo as reference. If you go to art school, this is how you’ll be introduced to anatomy. Artists have been working in this way for centuries, and it’s a fantastic challenge for any skill level. This sort of classical painting and drawing are often used for fine art.

Why it’s useful: Learning to see a person in front of you and transfer their likeness onto a page is priceless. There’s a reason artists have been painting portraits in this manner for most of recorded history. Even if you don’t use this for your commercial work, it’s a fantastic way to practice and learn about the body.
Where it falls short: It’s not nearly as versatile as constructive anatomy. If a comic artist needed to pose a live model for each panel of her comic page, she’d never finish the book. Used for more academic pursuits, drawing from life is generally a slower and less commercial process. Especially if you are working with larger than life settings like fantasy and Sci-Fi, observed anatomy can be impractical.
Resources:
The Artist’s Complete Guide To Drawing the Head by William Maughan - This book is the best resource I’ve ever read on portraiture. He focuses on the shapes of shadows to achieve likeness... and... it works! Certainly a must read.
Do you have more resources to add? Let's hear about them in the comments! I'll be updating the post as time goes on.
We're trained as children to think in terms of 'shape'. This is one of the things you have to overcome when learning to be an artist. Seeing shape is fine for some things, but observed drawing is best done in terms of form instead of shape. Shape is a 2D abstraction, form is seeing in 3d - with depth and volume. To finish out perspective week this video provides an exercise to help you envision form. All you need to do is go find some cool pictures of bugs!
And if you like this video, please remember to click the "Like" button at the bottom of the post! The only advertising for Ctrl+Paint is word of mouth, so I'm counting on you guys to spread the word. Thanks!
Assignment: Overlay form lines onto photos of interesting bugs.
Things to consider: Draw through the object, envision the structure.
In the last assignment you gathered costume reference for real-world professions. Now it's time to have some fun with that visual research! I've provided you some mannequin drawings to use as the foundation for character designs. Your goal is to make a few designs that would actually fit into a modern context. I don't want to see any space marines -- just real world professions. Think it's easy to draw a police officer? How about a fire fighter? Now is your chance to find out. As an illustrator or concept artist you'll need to draw things like this surprisingly often. Additionally, they help build your visual library for costuming and will improve your ability to generate sci-fi and fantasy characters. Good luck! And if you like this video, please remember to click the “Like” button at the bottom of the post! The only advertising for Ctrl+Paint is word of mouth, so I’m counting on you guys to spread the word. Thanks!
Assignment: Create realistic character designs (from reference)
Things to consider: Use specific details, "dress your model"
Recommended videos:Costume Reference, Costume Sketching
Worksheet Downloads:Basic Male Figures
I always use reference for my paintings. It's simply a matter of detail: there's too much stuff in this world to know about in detail, so I have to do a little visual research before I draw. Before the internet existed illustrators often kept "Morgue Files" or "Clipping Files" full of magazine photos. When an assignment came their way, they would go to their Morgue file and pull the appropriate images. Google image search and flickr have made the searching quite a bit easier, but the need is still exactly the same. In this video I'll explain how to create and manage a digital reference board - relying heavily on keyboard shortcuts. And if you like this video, please remember to click the "Like" button at the bottom of the post! The only advertising for Ctrl+Paint is word of mouth, so I'm counting on you guys to spread the word. Thanks!
Assignment: Create career-specific reference boards (Scuba diver, fire-fighter, etc.)
Things to consider: Well-lit photos, specific details
One of the best ways to learn about color and color relationships is to play. In this exercise, I invite you to use my illustration as a coloring book, and see what happens when you try different combinations and arrangements. Though the digital painting you end up with is not a portfolio piece, using my provided linework should keep you focused on the task at hand: changing the colors. And if you like this video, please remember to click the "Like" button at the bottom of the post! The only advertising for Ctrl+Paint is word of mouth, so I'm counting on you guys to spread the word. Thanks!
Assignment: Experiment with color schemes on the provided character designs.
Things to consider: Complementary and Analogous Schemes, Lock Transparent Pixels
Recommended videos:Basic Color Schemes, Unify Your Palette, Alternative Masking pt.1 (Lock Transparent Pixels)
Worksheet Downloads:Gorilla character Worksheet
In order to add details to a simplified 'dress-form' under drawing, you need to know how to think in proper 3D. This short video explains the importance of following the surface contours of your 3D form.
Make sure to catch the other parts of the constructive form miniseries!
Ctrl+Paint has mainly dealt with nude figures and classical study - but what if you want to draw a character with clothes? This video explores costume and fashion sketching from reference, and all of the photos used are from the fantastic blog http://www.thesartorialist.com/ .
Continuing where part 1 left off, this concludes your introduction to the pen tool. This video focuses on a real-world example, creating a technical outline around a character's silhouette. If you were to attempt this job with the lasso or marquee tools you'd quickly run into trouble. The true beauty of the pen tool becomes apparent when working on a series of technical curves.
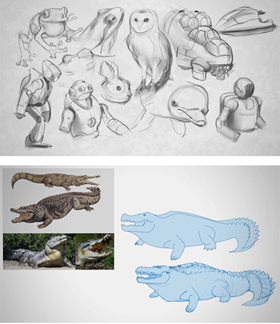
The goal of thumbnail sketching is to generate a large variety of design possibilities in a short amount of time. With this goal inmind, it's not 'cheating' to take a non-traditional approach. This video shows how to "built" your thumbnail sketches instead of simply drawing them. Using robots as subject matter, we'll first build a set of modular components, and then mix and match them to create a large variety of robot designs.
Sometimes the digital workflow will behave completely counter to the way you learned to draw with a pencil and paper. Though it might seem foreign and strange, I encourage you to embrace these new opportunities! In this video I'll show how to iterate through a set of thumbnails by chopping them up into pieces, mixing, matching, and contorting them. Though it's not much like traditional 'drawing', it's a lot of fun and can be a huge time-saver.
Creating an illustration which sits on a solid color background can be a challenge. If your goal is to have a nice, painterly, edge you might find yourself constantly re-working it. The method shown in this video strikes a balance between the time-savings of Photoshop layers and the painterly edge quality you're striving for.