Part 2: Brushes
Welcome to part two of the digital painting 101 series. In today’s short less we’re going to dig into the meat of photoshop painting: the brush and eraser tools.
One tool, many forms
You might notice that the tool palette contains both a Pencil and a Brush tool. This seems like a reasonable distinction – after all, traditional painters have brushes, pencils, airbrushes, pens, and more. So where are the buttons for airbrushes? Spray paint? Markers? The answer is found in a single tool: the Brush tool. This single tool can take nearly any form – ranging from pens and pencils all the way to watercolor and rubber stamps. For your purposes the brush tool will be the only thing you need to add pigment to your canvas.
To change the type of brush that you’re working with simply right click anywhere on the canvas (If you’re using a Wacom tablet, the lower half of the rocker switch serves as right click. Be careful when gripping the pen – otherwise you might right click accidentially!)
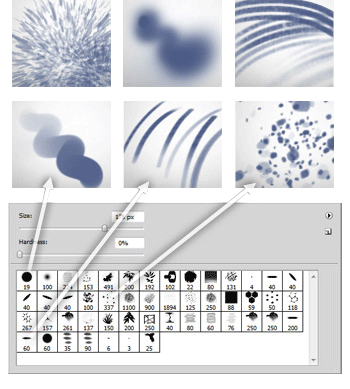
When you do this a secret menu appears near your cursor. Each of these icons represents a different type of brush. You can add to this list with things called ‘custom brushes’, or make your own.
What brushes should you use?
Any artist will tell you a different answer to the question of brush choices. The best advice I can offer is to start simple. Limiting yourself to a handful of useful, versatile, brushes is the best way to approach digital painting. Even though I’ve been painting for years, the three following brushes are used for 90% of my painting.

Hard round – This has a circular head and a sharp edge. It’s the most useful brush in all of photoshop.
Soft round – Also circular, this brush lacks the definition of the hard round. It’s more similar to an airbrush or spray paint. It is great for painting smooth transitions and moody atmosphere.
Hard flat – This is a variation of the Hard round. It has a flattened oval head and a hard edge. This has a more directional quality to it, but has a tendency to leave nice looking brush edge marks.
Click to download basic 3.ABR brush file
Installing the ‘Basic 3′ Custom Brushes:
- Restart Photoshop
- Make a new document
- Select the Brush (B) tool, and reveal the Brush palette
- Click on the small Settings icon
- Select the “Replace brushes” option
- Locate and select the mKohr_basic3.ABR file
Congratulations! You’ve now removed some unnecessary clutter. If you want them back at any time, find the ‘reset brushes’ option on the same menu.
Brush tool, expanded
By now you’ve probably experimented with the brush tool. It makes marks pressure sensitive marks in the active (foreground) color. With a few useful keyboard shortcuts, you can have much finer control!
Changing the color: To change the color without using the color picker, just hold down the ALT key. This changes your cursor to an eye dropper and wherever you click will select a new color.
Changing the size: To change the size with keyboard shortcuts, use the bracket keys found to the right of the “P” key. “[“ makes the brush smaller, and “]” makes the brush larger.
Alternately, hold down alt+right click and drag the red preview shape to alter the size of your brush (ctrl+option+drag on mac).
Drawing along a ruler: To draw a vertical or horizontal line, first hold down the shift key. As you draw, you’ll notice that your line has a magnetic quality as if you’re drawing along a ruler.
“Pulling a straight line”: To draw a straight line at any other angle, follow these simple steps:
- Click once to define the start, then release
- While holding shift, click to define the end of the line.
The one caveat of this technique is that the line’s intensity will fade as it progresses from beginning to end. Keep in mind that the side you begin with will be darker than the ending side. If you’re interested in making technical drawings, you could create a custom brush that has no pressure sensitivity – which wold function more like an ink pen. A custom brush of this sort would not exhibit the same fading effect.

Move your current layer around: While the brush tool is active, you can hold the Ctrl key to temporarily select the Move tool. This can be handy if you want to change the placement of the layer you’re drawing on.
The Eraser Tool
With all of that brush tool information you just trudged through, do you have the stamina left to learn about the Eraser tool? I’ll let you in on a secret: you already have. The Eraser tool functions exactly the same as the brush tool – but it removes pigment instead of adding it. Everything you learned about the brush tool applies!
Because they share a custom brush library, you have access to the ‘basic three’ erasers when you right click.
Homework: Brush Drills
You’ve just covered a lot of ground. To review, try your best to re-create the following drawing. I’ve used the “basic three” brushes to draw a variety of marks. Try to use exclusively keyboard shortcuts if you can.
